
I am so honored to guest post for Karen Berg at Redoux Interiors today!
Karen runs her own furniture and cabinet refurbishing company in the San Francisco Bay area and is AHmazingly talented.

Karen and I have never met in person but we have laughed together so many times over every day things that she feels like a lifelong friend. Karen’s introduction of me was pretty funny, that girl doesn’t forget anything, you can read it all here.

When Karen first called to ask me about guest posting for her, I was totally geeked and then the jitters set in. I wanted to present something that measured up to Karen’s level of painting, blogging and spunky style – but what? After all, it was only a year ago that I painted my first piece of furniture – what did I have to offer?

Standing in my garage, I spotted an old buffet I purchased a while back. I thought it would make a cool bathroom vanity but there were a few repairs that needed to be made before I could paint it.

The biggest issue I faced was how to fix the warped top. I removed the top and tried several suggestions to flatten it but it wouldn’t budge. It was constructed of is 3/4″ thick solid oak boards – what was I thinking?
.jpg)
I went next door and asked my neighbor to give me a lesson on using a router; specifically his router. He’s a finish carpenter and I needed two different routers and three different bits to create the profile. This was my first time using any router, let alone two but it was a blast to see the results. Good thing I didn’t slip ‘cuz I had only purchased one piece!

I wish you could have seen me when I was finished routing. I was literally covered from head to toe in a thick layer of sawdust. You’ve heard of the sandman, well I was the sawdust monster. I’m used to doing goofy things but I know what I want, so I do whatever it takes to get it done. See my fierce determination and brute strength? I can tell, you’re intimidated now – lol!

Karen laughs at me because I dig up shrubs and trees and move them around the yard like living room furniture. Seriously, I can’t be the only one out there who does this ~ am I?

Karen asked me to share some of my layering techniques with you today. I’m really not sure what I do differently because I’ve never had training, but I’ll do my best to show you some of my paint techniques.
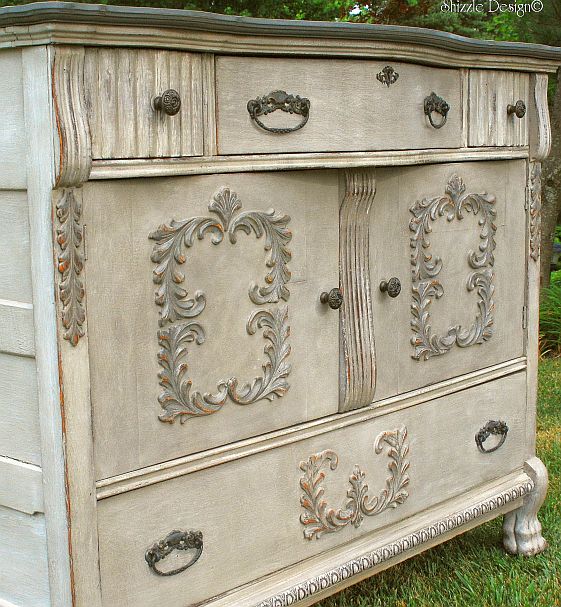
For this antique buffet, I did a base coat of Brown which I watered down a little so the paint would easily seep into every nook and cranny of the grainy wood & details. I LOVE using this as an undercoat! I just can’t get enough of it.

When it was dry, I went over it with a light gray. I love layering paint colors! I watered this top color down a bit creating somewhat of a wash so the base color would pop through. It also allows me to leave certain areas a little bare so the first color fades through almost as though it has worn naturally that way. I like it this way; it adds depth and plays a role in the old world finish I like to achieve.

When I initially paint a piece, I look it over and determine which features I want to draw attention to and which ones I want to downplay. I loved the detail across the bottom so I just lightly dry brushed the molding. I wanted the contrast of the Brown to really make a statement here.
This is where I step back and try to figure out what I’m going to do next. I don’t have any normal methods and have never taken an art class. I follow my own quirky path and simply design what I like. My goal is to create one-of-a-kind pieces that will steal the focus of any room. Do I always achieve that – no, but I try.

I wanted to bring out the texture of the wood grain a little more, so I lightly, I mean very lightly, dry brushed a vintage white in areas I wanted to highlight. There were a few times it went on too heavy but no worries, I just blotted it off with a damp rag and started over again.
This strange looking fly flew in to check it out. I think he likes it; what do you think – lol!

I painted the appliques in a mix of grays, adding some of the other colors here and there until I liked the way it looked. Because I paint with all natural clay and chalk based mineral paints, I can use a wet rag to distress areas by simply doing a rub, rub, rub over those areas. No sandpaper, no dust, no mess. I love doing it this way, but it doesn’t take much to entertain me : D

When you look at the piece as a whole, you can see each section varies a little in how I finished it. I do this intentionally so each portion isn’t matchy – matchy. That’s not my style.
You won’t find me with my hair done up or my nails manicured. I brush my hair, throw on a visor and some thrift store clothes and call it good. In much the same way, I like the character to shine through in my furniture re-designs. I want my pieces to be unique and their finishes to have lots of variations.
So are you ready to see the finished piece? Here goes…

What do you think? I love the brown undertones showing through the paint. It gives the illusion that I’ve spent hours antiquing it when I’ve basically just used a very simple layering technique to achieve this look and sealed it with clear wax. Don’t get me wrong, it didn’t happen overnight. I’m the type of person who needs time to process how things look and I tinker with the details until they’re just right. Yes, I drive myself bonkers most of the time, but it pays off in the end.

I shot this picture to show off my first routered piece. My camera is conking out on me so this shot is way dark, but you should be able to see it. I have to admit, I’m pretty proud of this first time router job. All I would have had to do is hit the tiniest piece of sawdust or tilt it ever so slightly and the whole profile could have been messed up. These routers are that sensitive. Dave also told me “don’t put your hand in there or you’ll lose it”. Yikes!!

To create the perfect shade for the top, I mixed a dark and medium gray (don’t ask proportions, I didn’t measure :). I just half stirred them together and started painting.


Wouldn’t this make a gorgeous vintage bathroom vanity? I can just see it with a beautiful vessel sink and an amazing faucet. The two narrow drawers would be perfect for make-up and brushes… and there’s a ton of space inside the center doors to house all your cleaners… Waaah ~ I want to keep it.


I wonder what they were thinking when they designed furniture way back when?

I really do love these colors together. How can you go wrong with this combo?

I love working with chalk & clay paints. So much so that I now retail the paints that we use. Ready to Shizzle it? We offer a complete line of chalk & clay paints, waxes, glazes, clear coats, metallic mica powders and the best chalk & clay paint brushes on the market. Take advantage of our sales now on our Online Shizzle Shop here.

All the details for upcoming workshops can be found HERE
Happy Painting!!
Want to create something like this? You can! Many other people have already ordered these paint colors and have started painting their pieces. I can’t wait to see what they do!! Explore all the colors of our paints and get inspired here. We carry a large supply of American Paint Company Paints on our Online Shizzle Shop here and in the Greater Grand Rapids area at several locations in Jenison, Caledodnia and Holland. Click here for locations, hours and directions. Keep up on all our newly painted designs by following our: Blog, Facebook Page or Pinterest.


Domestically Speaking – The Power of Paint Party
The Shabby Creek Cottage – Transformation Thursday
Miss Mustardseed – Furniture Feature Friday
2805 – Potpourri Friday
Fox Hollow Cottage – Pin the Tail on the Bloggy
Tatertots & Jello – Weekend Party Wrap Up
Common Ground – Vintage Inspiration Friday
Homespun Happenings – Rustic Restorations Weekend
Boogie Board Cottage – Masterpiece Monday
Between Naps on the Porch – Metamorphasis Monday
Thanx for Stopping by!


 For less than the price of a gallon of paint, you too can be on your way to painting furniture like a pro. Click here to download


